
Journal
Test A Design With A Silhouette Cutter

[vc_row][vc_column][vc_column_text]In a previous post, I talked about testing paint colors before starting work on a big project. Today I want to talk about a different, and perhaps more important, test that can save you from untold hours of unhappiness. With the new high-tech tools available today, we can make a scale-model of a design to wring out the bugs before we start on the real thing.
My current project involved making some really huge stencils. The design area of each stencil is 50” high and about 20” wide. In other words, they are much to large to make a full-scale test interesting. There just had to be a better way.
Silhouette Cutter to the Rescue!
I love it when the universe sends me the right person at the right time! I got a call from Terri Johnson at the beginning of 2014. She was looking for Paintstiks to use at one of her Silhouette Retreats. I had not been paying attention to the cutting machines that were coming into the market and I asked her to tell me more.
Terri graciously answered my questions about these amazing machines and assured me that I could use a Silhouette Cameo and sign maker’s vinyl to make scale models of my designs. Needless to say, I was pretty excited — and I fired off a string of orders.
I’ll be the first to say that there is a pretty large learning curve that comes with these machines. It’s not rocket science if you are comfortable around computers and drawing programs, but it’s certainly not trivial. (Of course it would help if I would take the time to sit down and play for a day, but I was in a hurry…)
As I usually do, I learned just barely enough to send my design from Adobe Illustrator to the Silhouette cutter, then watched in amazement as the machine worked it’s magic. It took me at least 20 hours to cut the shapes from one of my big stencils, but the Silhouette cutter zipped out the small scale versions in about 20 minutes each!
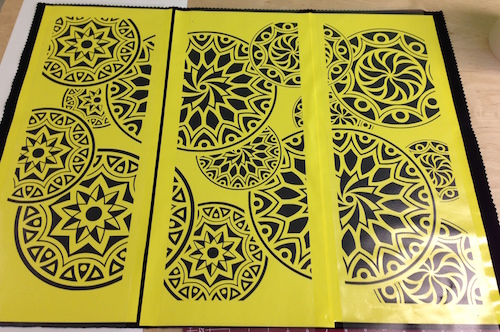
The next step was to transfer the vinyl stencils to a piece of black fabric. Sign makers do this every day, but the process of transferring the sticky-back vinyl from the backing paper to the fabric was all new to me. I had a few wrinkles here and there, but it was certainly good enough to paint out a test design.
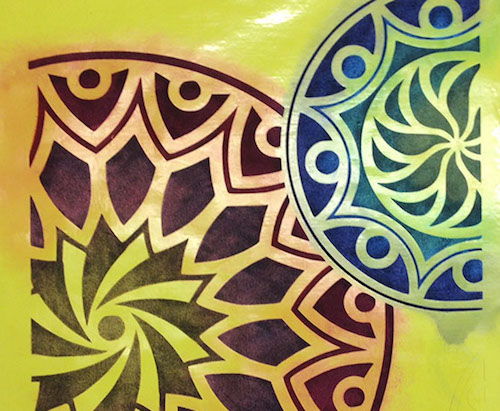
After one or two smaller experiments, it was time to test the colors I had chosen on the actual design. I pulled out my Paintstiks, shut off the phones and got to work. Because my test piece was small, about 30” x 20”, I was able to paint out the design in just over 3 hours. I took a break for lunch then headed back into the studio to peel off the vinyl stencils.
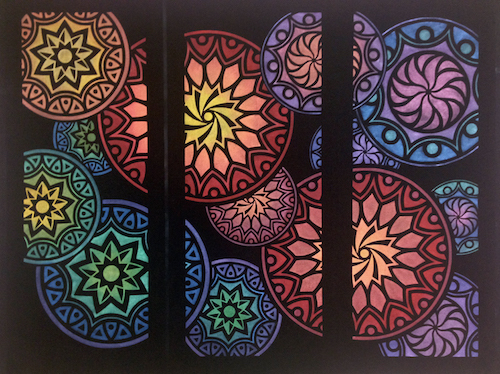
After I removed all of the vinyl, I had a perfect scale model of my design! Woohoo! My scale model allowed me to correct a few problems in the design — and to make changes to my color scheme before I started painting on the large panels.
I probably spent 20 or so hours figuring out how to cut the stencils on the Silhouette, transferring the stencils to fabric and painting out the scale model. But that was pretty trivial compared to the amount of work involved if I had decided to make big changes in the middle of my project.
I am amazed at the high-tech tools that are quickly becoming a part of everyday life in the world of fabric art. I expect that I will continue to do a lot of the work on my large projects by hand, but I thoroughly enjoy the ability to test my designs with these high-tech wonders.
Do you have a favorite high-tech art tool?
Learning to use my Silhouette cutter (properly) is high on my list of things to do. Do you have a high-tech tool that makes your art easier and more fun? Leave a comment below or click over to our Facebook page. I love to hear what’s going on in your creative space![/vc_column_text][/vc_column][/vc_row]
Shelly — This is absolutely stunning! I love it! You are amazing! Thanks for the shout out! And glad you are loving & using your Cameo! Terri
Thanks, Terri. I can’t thank you enough for answering all my questions. I’m still taking baby steps with the Silhouette, but it paid for itself many times over with this one experiment.
Shelly, I have an article in Creative Machine Embroidery issue March/April 2015 that features paintsticks on a black denim jacket. It is page 44. I have given your website as a resource. Check it out, I hope you like it! You have inspired me to play with all of my toys! The jacket was one of my first paintstick projects!!!
That’s great, Kim! Where can I pick up a copy of the magazine?
Oh I meant to add that my challenge is figuring out how to make my new cutting machine work for me too!
Oh good, it’s nice to know it’s not just me. 🙂
Hi Shelly. I have a Silhouette Portrait (smaller than the Cameo) that I use for scrapbooking rather than fabric art – at least so far. I, too, am amazed at everything that can be done. I’ve only scratched the surface. Silhouette led the pack with computer designs rather than cartridges, but big dog Cricut has now come out with a software-based machine too. Your design is marvelous.
Hi Barb! It’s great to hear from you! Ya gotta be careful if you hang around here… we’ll get you into fabric yet!
I’m intrigued by the thought of a 50″ high stencil. Why and what for? Are you designing a new stencil? But why 50″ high? That is almost over my head!! (For me LOL means “Little Old Lady)!!
Actually, my big project called for three big, huge stencils. They look just like the ones in the test image, but much, much bigger. I have been working on a 3-panel piece for the past year. Now that the hand stitching is done, I’m turning each panel into a quilt.
These stencils are just for me. I can’t begin to think what it would cost to manufacture them! Nor do I think anyone else really wants to tackle a project this size. 🙂
Can the vinyl be re-positioned and reused or is it a one time use? I have a Cameo and need to use it for more than making cards, etc.
With all of you ideas, I need to Clone myself and live 10 lifetimes to even touch the surface. Thanks for all the great ideas.
I hate to disappoint you Janice, but the answer is no. When you peel the vinyl up off the fabric, it stretches and gets distorted. But, the vinyl is very inexpensive if you purchase from a sign supply business. I purchased a 25-yard roll (12″ wide) for $32. That will keep me for a while!
By the way, be careful about that cloning thing. I figure my hubby has enough on his hands with just me. What would he do with another one? 😉
Love this and I also have a Cameo. What about cutting the designs out of freezer paper or thim acetate?
Freezer paper for sure, Phyl. I have not figured out how to cut stencils properly from stencil plastic. I see videos on YouTube, but I have not take much time to really get to know my machine yet.