
Journal
Star Flower: A Paint+Stitch+Bead Adventure

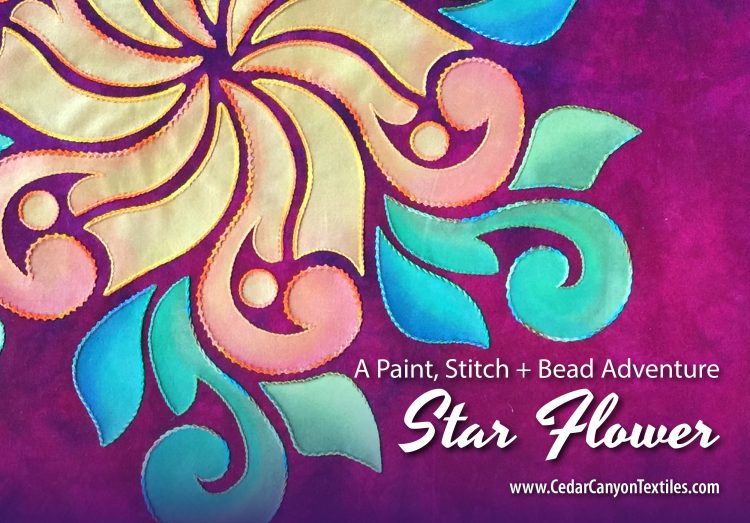
As part of my “timeout” from the business here at Cedar Canyon, I’ve spent a good deal of time on my Star Flower project. It’s the first of my Paint, Stitch & Bead adventures that will be a completed piece of art instead of a learning tool.
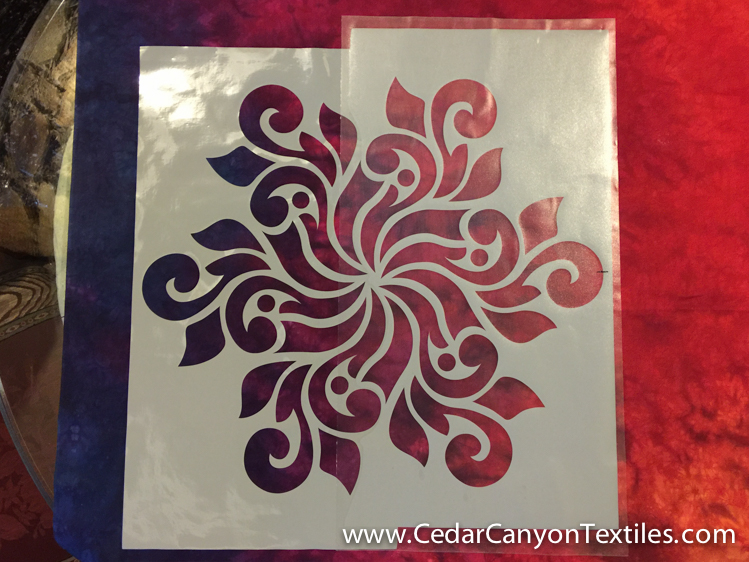
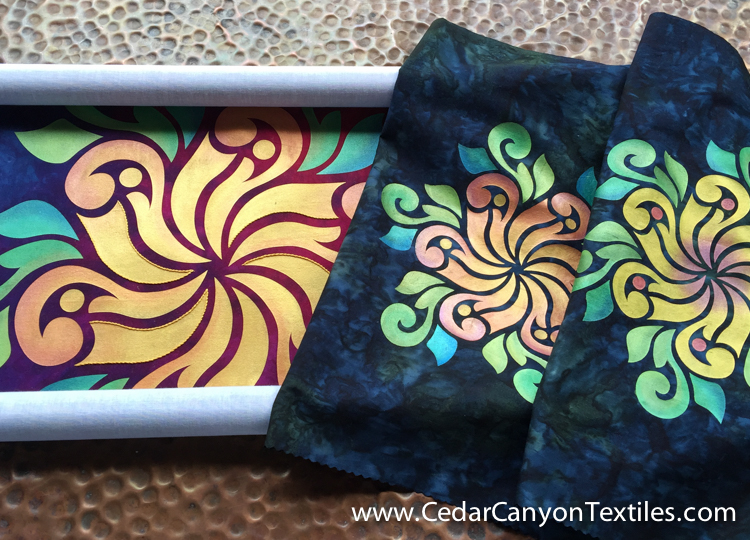
Two-part stencil for painting a larger image
I created the design using the Silhouette Studio software, and cut a Renegade Stencil using my Silhouette Cameo cutting machine. As with most of the cutting machines sold in the craft market, the Cameo is limited to cutting materials up to 12″ wide.
I wanted a larger image, so I created a two-part stencil and had a friend help me place the stencil on the fabric. (Sometimes, you just need more than two hands!)

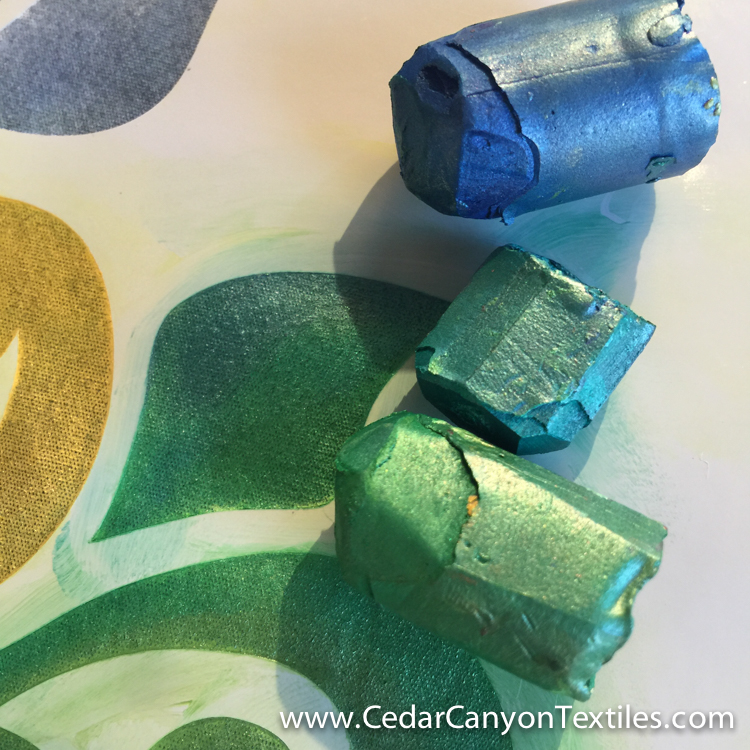
Record paint colors with photos
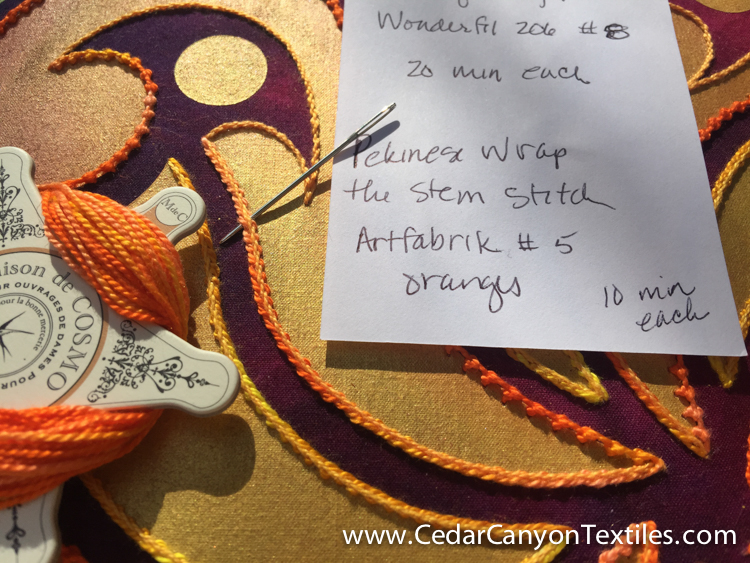
Rather than taking a bunch of notes, I took photos as I worked to record paint colors, thread colors, stitches, and so on.
Removing the Renegade stencil
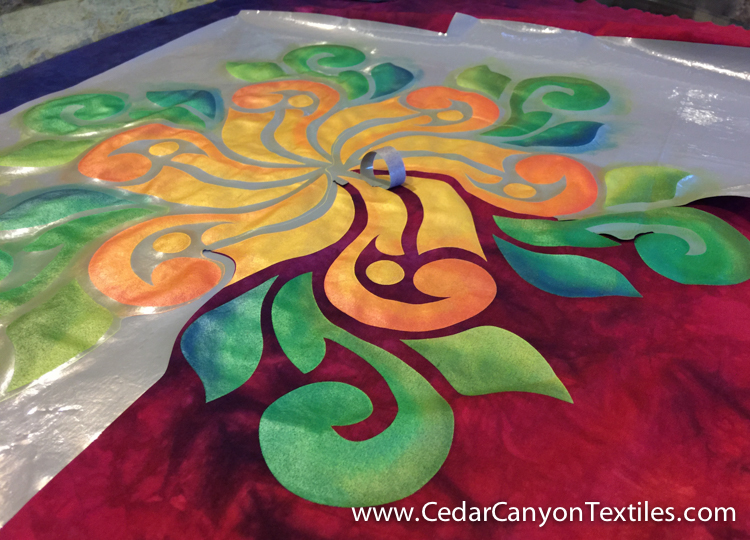
I completed the painting in two days, and then forced myself to wait until the next morning to peel up the Renegade Stencil. It was oh… so… tempting… to peel it up right away, but I didn’t want to smudge any paint.
On the stitching frame and smaller color tests
Here’s a photo of the Star Flower piece on my stitching frame along with a couple of the smaller color tests I painted before jumping into the big project. I love the fact that I can scale images down and test scale models of an actual design. It’s definitely worth the extra time and effort. For me, it takes the fear out of painting on the “real” project.
Recording stictches, thread, time spent
I’ve been curious about how much time I actually spend on a piece like this, so I decided to keep some records. As I completed each section of stitching (and beading), I made a note about threads, colors, stitches and time spent.
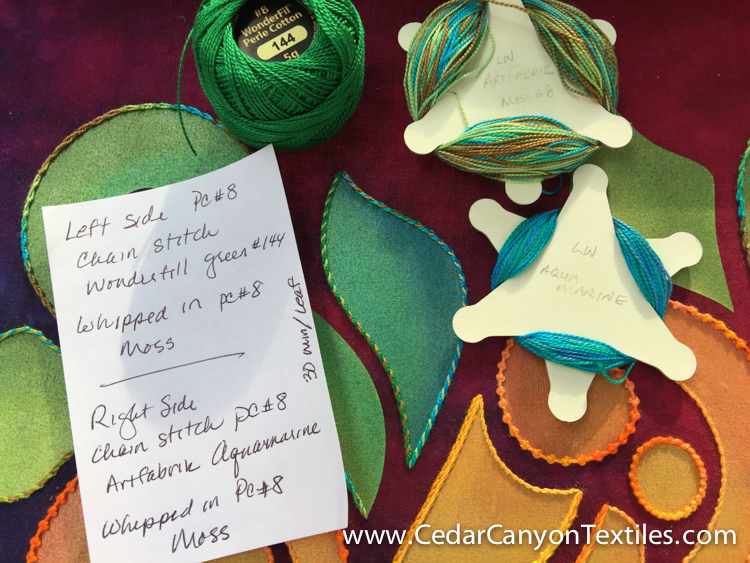
More stitch/thread/time records
The best part about the notes will be the record of stitches and thread. It will be a whole lot easier than trying to remember what I did in which section. Stitches can look a lot different after they are wrapped and beaded.

Detail of beaded stitches
Once all the stitching was complete, I added beads to the flower in the center. These are beaded stitches I’ve shown here on the blog. The orange on the left is the Beaded Palestrina Knots. The gold beads in the middle on the right are added to a Pekinese Stem Stitch. Finally, those delightful gold beads at the top right are Knotty Stop Beads.
Star Flower: It’s a Wrap!

Ready to quilt!
After adding beads to the flower, I decided it was time to stop. More beads are tempting, but it was starting to feel like overkill. So… onto the finishing steps!
Of course, this begs the next big decision. Shall I turn it into a quilted wall hanging? Stretch it on a gallery-wrapped canvas as an embroidery? Got any other brilliant ideas for me?
Pop in with a comment below. I’d love to hear how you would finish this Star Flower stitched painting.
 Learn to Stencil on Fabric with Renegade Stencils
Want to know more about stenciling on fabric with Paintstiks? There’s an eBook for that!
Stenciling on Fabric with Renegade Stencils and Shiva Artist’s Paintstiks is a step-by-step guide to adding images to fabric with sticky-back vinyl stencils. 15 pages, full color, digital download, just $9.95.
[maxbutton id=”18″]
Shelley, absolutely beautiful work. A lot of relaxing “therapy” while working on this I bet! Hand work always gets me in the zone….
I usually mount on canvas as the piece is nice and secure and retains its shape.
Well done.
Thank you, Susan. Therapy is an understatement. The weather here has been gorgeous, and I did most of the stitching sitting outside on my patio. It simply doesn’t get any better than that! 🙂
Thanks for your thoughts on the mounting issue. I’m really torn between quilting, mounting on canvas or framing in some way.
How beautiful! I did not see the size mentioned . If it is not to large , I think I would frame it in a display frame with non reflective glass.
Thanks, Jan. I just measured (again). The painted image is 20″ across, so the piece needs to be at least 24″ square. Not too large to be framed, but I’d like to hang it here in the house and all my walls are round. Another consideration…
This is magnificent! How big is it? I have been thinking of two or three part stencils to get a bigger design. I did put an extra stencil for a border on the next project and had to have my husband help with the placement. Looks like the line between the two stencils is curved, is that the case? Is there a reason. Again Lovely work!
Thanks, Rebecca. It’s 20″ across. I decided to tackle a 2-part stencil before I jump into 3 or more part stencils.
You have a good eye for details. Yes, the line between the two stencils is curved. I actually had to build the “overlap” into the stencils in order to get the placement to work. I attempted to cut out the overlap area by hand the first time. Not a pretty sight! But that’s how we learn what works.
Hi Rebecca,
How are you? Hope you are staying safe and warm during this frigid Winter.
I sure to miss the flow of uploaded images and commentary from our 2017 classes that ran from January thru April….
Hi Elizabeth, All is well. Been very busy finally catching up on some projects
It is gorgeous and would be a wonderful wall hanging. I am curious as to how you get such brilliant colors on a dark background. Do you paint with white before the color or do you just lay done several layers of really thick paint?
Hey Mags! Always great to hear from you. The answer to your questions is “both.” I did start with a layer of Titanium White and let it dry overnight. Then multiple layers of paint for Extreme Stenciling.
I’ll be demonstrating exactly this process in my CraftCast class on Feb 3rd. The class is about making a Journal Cover, but the paint process is exactly the same. Here’s the link to the Starry Night Journal Cover Class.
Absolutely beautiful, as usual Shelly! You’re giving me ideas for a small quilt I want to work on for a challenge, thanks! I’m looking forward to your class on Craftcast too.
Wonderful! I love to send new ideas off into the universe. I’m delighted that you’re joining me over at CraftCast. I had my run-through with Alison today and it should be great fun!
This is absolutely beautiful. I’m intrigued that you beaded it before quilting? Is it not very difficult to avoid the beads while quilting – or are you planning to hand quilt?
Ah, another very observant person! I did, indeed add the beads to the stitching prior to quilting. (I haven’t figured out a way to add them after quilting as I need to be able to access the back of the fabric.) That does, indeed limit the quilting options, at least for the center section. My friends in MN will have a good laugh at this, but I am contemplating hand quilting.
Shelly, as usual your combination of design, color and texture, created a strikingly
beautiful piece of art.
In some of the photos, the background fabric looks like batik in others it almost appears like a
Cherrywood fabric. Have you stenciled and painted on Cherrywood fabric? I have done
a little painting on Cherrywood; and, I want to do more this Spring.
I am very interesting learning to improve my Paintstik skills.
Will the Craftcast provide in-depth visuals and instruction? I am aware that I will be
able to view the class as often as I need. I am contemplating enrolling.
After taking two of your classes, early in 2017, I challenged myself to create a small art quilt where I interlocked three stars with my original designs – made from 3 Renegade stencils. It was an exciting experience.However, before I create another, I want to dramatically improve my ability to work with Paintstiks.
Thank you, Elizabeth. I’m very happy with the results. The base fabric is a hand-dyed gradation created by one of my friends. Cherrywood is absolutely lovely. You’ll enjoy working on it.
The CraftCast class is a different format than my typical classes. Most of the information is in the videos, not in the downloadable files. (Although you will get the design files along with the class.) We’ll be talking through a series of videos during the webcast, and it definitely includes an in-depth look at how I achieve the solid look with the Iridescent Paintstiks. I hope you will join us.
Shelly, thanks for the information. I am planning to sign up for your CraftCast class. The ability to re-watch you working with Iridescent Paintstiks is what I am looking for.