
Journal
Choose Colors With Confidence!
by Shelly Stokes, Founder and Creative Mentor

One of the students in the Totally Textured online course asked for advice on choosing Paintstik colors for a piece of fabric. Now, I have to admit that I usually “go with my gut” — choosing colors by instinct rather than some set plan. And that’s not terribly helpful!
As I mulled over her question, I remembered a fantastic idea for testing colors from Nancy Kazlauckas, along with a guest article that she wrote for me several years ago. With our Totally Textured course underway, and another course starting in mid-March, this is a great time to pass Nancy’s advice on to everyone in the Community. (You can get the details about the March course or register here.)
Here are Nancy’s thoughts on testing colors (at the end of the post, I added a short set of instructions, along with a few additional photos from her color test):
I painted a jacket for the 2010 Bernina Fashion Show, and Shelly was able to help me with the colors I wanted to use. Shelly knows her colors – so the various shades of the greens, blues, purples, both matte and iridescent, played well together on the final piece. Before I started painting on the jacket fabric, I tested each of the colors to make sure I knew what it would look like.
 Every time I work on a new piece of fabric and want to achieve my “vision,” I do a color sample on the fabric I am using for my project. I make a note as to the color of the paintstik, and then do a small (1” x 1”) stencil (applying the paintstik using a brush) and a rubbing (doing a rubbing using the paintstik directly on the fabric). Then when I am painting my final piece, I can reference the sample so I know what color I will get when I pick up the brush or the paintstik.
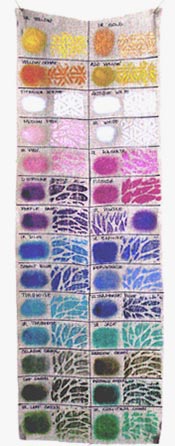
This is the sample I used for the jacket. It was neutral linen fabric, but I needed to know what the iridescent blue or teal was going to look like next to the matte turquoise or green.
Before making the background rubbings, I sprayed the rubbing plates with a temporary adhesive, and the linen fabric stayed put for me to achieve a nice clean rubbing of the image. Without the temporary adhesive, the linen fabric would slip all over the place, and the image would be broken and distorted.

As you can see, this is one fantastic jacket! Here’s how you can do Nancy’s Color Test for your projects:
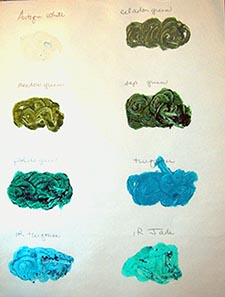 Step 1: Write Color Names on Palette Paper and Apply Color
Nancy’s first step was to gather up all of the colors and put each one on palette paper. She labeled each color on the paper to make sure she knew exactly what she was working with. If you are only testing a few colors, you can probably get by without labeling the palette paper, but Nancy tested 28 colors and it was really important to keep them all straight.
Step 2: Make Grid on Fabric and Add Test Colors

Her second step was to draw a grid on a piece of her jacket fabric and label each section of the grid with a color name.
With the first color in the test, she applied a small section of color with a stencil brush and made a small rubbing.
Step 3: Repeat For Each Color In Your Test
By adding each of the colors that she might want to use to her test strip, Nancy was able to audition the colors before actually adding them to her jacket fabric. You can too!
When you do a color test for your project, you will be able to see how each color interacts with your background color, and you can fold the fabric as needed to see how 2 colors will look next to each other.
Nancy’s color test is the best possible way I know to boost your confidence in the colors you choose for your project. A huge thanks to Nancy for sharing this great tip with everyone in the Community. This is one fantastic idea that will never go out of style!
P.S. Nancy’s jacket was featured in the October/November 2012 issue of Vogue Patterns Magazine. I’m not sure if issues are still available, but if you see one, it’s worth picking up.
This article was extremely helpful. Just like auditioning thread for quilting a quilt top and “puddling” the thread on all the colors. I’m looking to designing some fabric to use in a jacket and this article helped.
That’s great, Theresa! I’m so glad you like Nancy’s color testing idea.
This is a fantastic idea! I have done something similar with lines of paints, but not with the sticks.
Jaw dropping gorgeous!
Joan
Well said, Joan. Nancy’s jacket was for the Bernina Fashion show, so the flowers and leaves were painted in an over-the-top bold style. For a runway event, everything has to be clearly visible from a long distance.